28/08/2011

Finally Finished Bedroom

Good Afternoon.

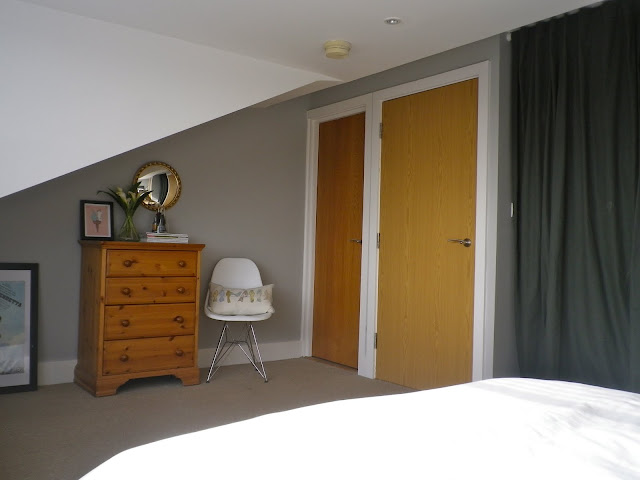
It's a Bank Holiday Weekend here in Blighty, and according to some ancient law, one MUST do some kind of DIY.  We chose to paint, and finish the much neglected bedroom.  We'd fallen into a trap with the bedroom-the 'no-one will see it but us' trap which meant that other, more public rooms got all the attention, whilst we woke up every morning in a white, bland, hand-me-down furniture and uni house bed kinda way.  Cue obligatory before shot.  Note the dark gray wall (Which I liked for ages, BTW), the country pine bedsides and the bubble glass lamps.  Nice.


So, you saw what we did with our bed, which was to build up the headboard and upholster the whole thing in lovely grey felted wool.  That was a good start.  Then we picked up some really nice bedside tables (Actually they were 'coffee tables' but I don't think anyone minds...).  We also found some old Anglepoise model 90 lamps.  We couldn't find matching ones, so I have a white one and the Mr has the black one.  One day we might buy another one so that they match, but these were free :-).


The Bank Holiday Weekend Paintjob saw us covering over that dark grey wall (and indeed all of the other walls) with Dulux Once in Chic Shadow.  Yes.  This is the same colour as the living room.  I think it's my favorite paint colour now.  The door frames now look nicer, the baseboards look nicer, hell even our furniture looks nicer.  We even managed to put up and old mirror that we got in a charity shop for £3.00.  It  always looked awful against the white, but somehow it just works against the grey.


OK, OK...Here's a pic of the AWFUL chevrons I painted in the wardrobe.  We're going to sand them down, paint over in grey and start again.  Any ideas how I can get them neater?


All in all, the bedroom is so much calmer now.  It was much nicer to wake up this morning :-).  Eventually I's like to swap out the Eames (It's actually one of the dining chairs and needs to go back...) for a Bertoilla Diamond Chair (or something similar...), with a yellow chevron cushion perched on top.  Sigh.

There is no rest for the wicked though, as tomorrow we're planning to paint the hall starts and landing (An onerous task as we have a wall nearly 5 meters tall) in a gorgeous shade of olive green-grey.

21/08/2011

Of Country Parks and Crumbles...

Hello there, I've decided to integrate some of my exploits and baking into this blog, and create a well rounded picture of my life :-).  Today we took a trip to Manor Farm Country Park where I saw piglets and lambs and chickens, and even milked a cow.  I went through a victorian school lesson and hand fed a turkey.  We walked for miles, and on the way back to the car we pilfered blackberries from the hedges.
Once home, I decided that a tasty blackberry and apple crumble was in order.  Alas, I wasn't using scrumped apples-I've given up that habit after the Mr. discovered and honest-to-goodness caterpillar in his lunchtime apple...
There's all sorts going on at the moment too!  I painted the en suite bathroom lemon and added lemon and grey chevrons to the inside of the wardrobe (but it kind of sucked).  We're planning on repainting the hall stairs and landing green-grey, the bedroom the same dove grey as the lounge, and adding a touch of grey to the dining room-as well as get a new desk out there!  Busy busy!

See you next time (I may be brave enough to share my rubbish chevrons yet...)


07/08/2011

Bored of the Ironing Board...

Good Evening.

Straight to the point.  My ironing board has seen better days.  We bought it when we moved into our first place a couple of years ago, and it was the cheapest in the Argos catalogue.  Oh how times change :-D

The shameful shot:


So, rather that splurge on a whole new board I've been on the hunt for the perfect cover.  Never going to happen.  I certainly didn't find a Brabantia jobbie that would do the trick, and some of the nicer ones would be too big due to the board being so cheap.  The next logical step was to have a peek at Etsy but by the time you add shipping to the UK things get a bit steep.  My budget was ideally around £15, so I decided I''d have a crack at making my own.
I headed to John Lewis, and picked 2 meters of beautiful Tanya Whelan fabric, which was half price and some 4oz flame retardant wadding.  Armed with tutorials I found on Pinterest (Oh dear, I think I'm addicted), I set to work...
Materials ready to go (That tubby chap is my pincushion ^_^)

The Board with the old cover removed and set fire to...
I sort of skipped a step here.  There are two layers of wadding in there, cut the exact size of the board top.  The fabric is good side down, then cut the same shape as the board but with a 4-5in border.
Then I pinned a wide hem around the outside with string in the channel, so I can use this as a drawstring to tighten the cover on the board later.
At the end I left a little gap for the string to hang out so that it can be tied up.  I had planned to tie ribbon to the string a little further down, but the knot that was created was HUGE and made a huge lump in the channel.  I seriously thought that the knot would stop the string from moving in the channel, and thus stop the drawstring action from working.  I had at it with my sewing machine, and removed the pins...
Oooooh...
 Voila!  One shiny new ironing board cover!

Even though I didn't use ribbon in the drawstring, I wanted a cute little tie off, anyway.  Right then, glam, creative bits over-I now have to do the actual ironing.  Sad face.


02/08/2011

The Great Wardrobe Experiment

Good Evening!

Over the years I've tried and failed so many times to keep my wardrobe in order.  Even living in an amazingly small space didn't kept me in check.  But this time I vowed to try harder, and I think it's working.  Our bedroom has a bizarre nook with a higher ceiling than the rest of the room, and it's in here that we have installed some IKEA Stolmen poles and a small chest of drawers.  For a very long time (Read:Several Years) it looked like this:
Having enough of ironing my clothes both when they went in and when they came out I developed a Plan.  I wrote myself a plan for getting the beast tidy, and some 'rules' for keeping it that way.

Getting Tidy

1.  Sort out the clothes.  I took everything back and followed the old '6 month' rule.  If I haven't worn it in 6 months, it goes.  Yep.  Harsh, but it works.  Now everything in my wardrobe is something I love.

2.  Work out what works.  I find it easier to have stuff hanging, the Mr likes things folded.  Once you figure out where you're likely to put stuff when you finish with it, you can work out where it needs to be in the first place.

3.  Put everything back!

Keeping it That Way

My simple rule is to put things away.  Even if I don't feel like it first thing in the morning, I will fold up my pyjamas and put them in the drawer.  That skirt I want to wear tomorrow?   Back on the hanger, not slung over a chair.  Belts?  Hair accessories?  Necklaces?  They all head into the cute tin pail, and stay there.  


There were a few changes as we figured out what worked...The big box for shoes, and the tin pail for 'stuff'.
It seems to be working so far-and I'm ironing much less. :-)